연관관계 매핑을 해야하는 경우가 많다. 예를 들어 학생을 가지고 학생에 소속 반을 찾거나 반을 사용해서 학생들을 찾거나 할 때가 있다.
이 때 양방향과 단방향 관계가 존재하는데 아래의 객체 형태를 보면 이해가 더 쉽다.
단방향
class Student {
Class class;
}
class Class {}
양방향
class Student {
Class class;
}
class Class {
Student student;
}
이중에서 먼저 단방향 연관 관계에 대해 먼저 공부해보자.
단방향 연관관계
- 학생과 반이있다.
- 학생은 하나의 반에 소속된다.
- 학생과 반은 다대일 관계이다. (학생이 다, 반이 일)
- 학생 테이블을 담는 객체는 Student, 반 테이블을 담는 객체는 Classes를 사용한다.
- 학생 테이블은 반 테이블의 키 CLASSES_ID를 외래키로 반 테이블과 연관 관계를 가진다.
학생 테이블이 다, 반 테이블이 일로 다대일 관계이기 때문에 Student 클래스에 포함된 Classes 객체에 다음과 같이 선언한다.
1 2 3 | @ManyToOne @JoinColumn(name="CLASSES_ID") private Classes classes; | cs |
@ManyToOne
- 다대일 관계라는 표현
@JoinColumn(name = "CLASSES_ID")
- 조인 컬럼은 외래키를 매핑할 때 사용한다. 이 어노테이션은 생략해도 된다.
- 만약 생략 할 경우 외래키는 다음과 규칙으로 찾는다. 필드명 + _ + 참조하는 테이블의 컬럼명 그래서 위에서는 생략할 경우 classes_CLASSES_ID의 형태의 외래키를 찾는다.
다대다 테이블 관계 매핑설정이 끝난 객체
1 2 3 4 5 6 7 8 9 10 11 12 13 14 15 16 17 18 19 20 21 22 23 24 25 26 27 28 29 30 31 32 | package com.wedul.springboottest.student.dto; import lombok.AllArgsConstructor; import lombok.Data; import lombok.NoArgsConstructor; import javax.persistence.Column; import javax.persistence.Entity; import javax.persistence.Id; import javax.persistence.Table; /** * springboottest * * @author wedul * @since 23/10/2018 **/ @Table(name = "classes") @Entity @Data @NoArgsConstructor @AllArgsConstructor public class Classes { @Id @Column(name = "CLASSES_ID") private String id; @Column(name = "name") private String name; } | cs |
1 2 3 4 5 6 7 8 9 10 11 12 13 14 15 16 17 18 19 20 21 22 23 24 25 26 27 28 29 30 31 32 33 | package com.wedul.springboottest.student.dto; import lombok.AllArgsConstructor; import lombok.Data; import lombok.NoArgsConstructor; import javax.persistence.*; /** * springboottest * * @author wedul * @since 23/10/2018 **/ @Entity @Table(name = "student") @Data @NoArgsConstructor @AllArgsConstructor public class Student { @Id @Column(name = "STUDENT_ID") private String id; @Column(name = "name") private String name; @ManyToOne @JoinColumn(name = "CLASSES_ID") private Classes classes; } | cs |
삽입
그럼 이 다대다 관계를 이용해서 데이터를 넣어보자. entityManager를 데이터를 삽입하는 코드를 만들자
1 2 3 4 5 6 7 8 9 10 11 12 13 14 15 16 17 18 19 20 21 22 23 24 25 26 27 28 29 30 31 32 33 34 35 36 37 38 39 40 41 42 | package com.wedul.springboottest.student.serviceImpl; import com.wedul.springboottest.student.dto.Classes; import com.wedul.springboottest.student.dto.Student; import com.wedul.springboottest.student.service.StudentService; import lombok.extern.slf4j.Slf4j; import org.springframework.stereotype.Service; import javax.persistence.EntityManager; import javax.persistence.PersistenceContext; import javax.transaction.Transactional; /** * springboottest * * @author wedul * @since 23/10/2018 **/ @Service @Slf4j public class StudentServiceImpl implements StudentService { @PersistenceContext private EntityManager entityManager; public StudentServiceImpl(EntityManager entityManager) { this.entityManager = entityManager; } @Override @Transactional public void insertStudent() { Classes classes1_1 = new Classes("1-1", "1학년 1반"); entityManager.persist(classes1_1); Student wedul = new Student("1-1-01", "wedul", classes1_1); entityManager.persist(wedul); Student chul = new Student("1-1-02", "chul", classes1_1); entityManager.persist(chul); } } | cs |
테스트 코드를 통해 테스트해보자.
1 2 3 4 5 6 7 8 9 10 11 12 13 14 15 16 17 18 19 20 21 22 23 24 25 26 27 28 29 | package com.wedul.springboottest.member; import com.wedul.springboottest.member.service.MemberService; import org.junit.Test; import org.junit.runner.RunWith; import org.springframework.beans.factory.annotation.Autowired; import org.springframework.boot.test.context.SpringBootTest; import org.springframework.test.context.junit4.SpringJUnit4ClassRunner; /** * springboottest * * @author wedul * @since 03/10/2018 **/ @RunWith(SpringJUnit4ClassRunner.class) @SpringBootTest // rolleback 설정 public class MemberTest { @Autowired MemberService memberService; @Test public void jpa_test() { memberService.jpaService(); } } | cs |
조회
|
1 2 3 4 5 6 |
@Override @Transactional public void selectStudent() { Student wedul = entityManager.find(Student.class, "1-1-01"); print(wedul); } |
출력 결과
아이디 : 1-1-02, 이름 : chul, 소속반: 1?? 1?
ㅁJPQL을 사용한 조회
|
1 2 3 4 5 6 7 8 9 |
@Override @Transactional public void selectStudentWithJPQL() { String jpql = "select s from Student s join s.classes c where s.name=:studentName";
Student student = entityManager.createQuery(jpql, Student.class).setParameter("studentName", "chul").getSingleResult(); print(student); } |
연관관계제거
|
1 2 3 4 5 6 |
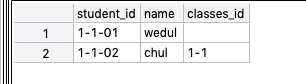
@Override @Transactional public void removeClasses() { Student wedul = entityManager.find(Student.class, "1-1-01"); wedul.setClasses(null); } |
wedul 학생의 반 정보가 지워진것을 알 수 있다.

생각보다 어렵지 않다.
'web > JPA' 카테고리의 다른 글
| JPA 관계 유형별 엔티티 설정 방법 (0) | 2018.10.31 |
|---|---|
| 연관관계 매핑 (다대일 - 양방향) (0) | 2018.10.26 |
| JPA 매핑 어노테이션 - DDL 2 (0) | 2018.10.13 |
| JPA 매핑 어노테이션 - DDL (0) | 2018.10.12 |
| JPA 영속성 컨테이너에서 엔티티 사용하기 (0) | 2018.10.11 |